Workflow Automation
Definitions
To ensure best performance, your CRMdesk system contains the following customizable elements:
- Assign Rules – directions for the system to choose appropriate user to assign a new question submitted via the Customer Desk or Support Desk interface, Assign Rules are optional – users are able to assign questions immediately without using the Rules.
- Mail Rules – directions for creating new questions based on requested received via e-mail interface.
- Escalation Rules – directions for the system on who to reassign questions left untreated for certain time periods. These Rules ensure that no customer request if left without attention.
Tips
Using Rules is the best way to speed up your question processing. As the number of new questions grows, add new and change existing Rules once in a while.
When defining Rules’ priority, move the most specific Rules to the top of the list, and bring the most general ones to the bottom. This will ensure that the system will assign questions using the most specific criteria first.
Assign Rules Maintenance
Usage
Assign Rules are used:
- Whenever a question is created through the Customer Desk;
- Whenever a question is received via e-mail interface, after the Mail Rules have been applied;
- When a question is created or reassigned in Support Desk and the user wants the system to make the assignment automatically.
To define the assignee, the system uses the category of the question as well as the presence of user-defined character strings in:
- Opener’s name;
- Question summary;
- Question body;
- Customer and question custom fields’ values.
Path
Setup tab – Workflow – Workflow rules – Assign Rules section
Procedure
To define the assignee for all records for which no rule exists, choose a user in the Assign all unassigned records picklist field. If, after applying all available Assign Rules, no assignee has been found, the system assigns the question to the person you specify here.
To change a Rule, click the Rule description in the list. To create an Assign Rule, click the Add Rule button below the Assign Rule list. You can also change the order in which the Rules are applied during question processing by clicking Move Up or Move Down buttons next to the Rules’ description in the list. The Rule at the top of the list is applied first, and the Rule at the bottom is applied last.
Example
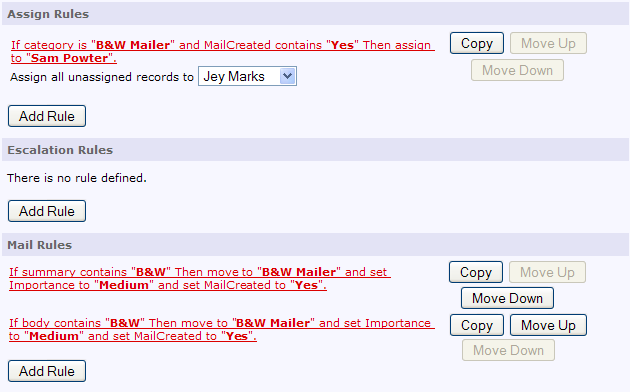
You want all new questions be assigned to user Jey Marks if they:
- Relate to product B&W Mailer, and
- Are of High importance, and
- Are created by customers referred by the Aqua or Tennison’s Yard agency.
First, you create two required customer fields: ‘Importance’ and ‘Referring Agency’. Thus, the priority of questions and all Aqua or Tennison’s Yard customers can be easily identified.
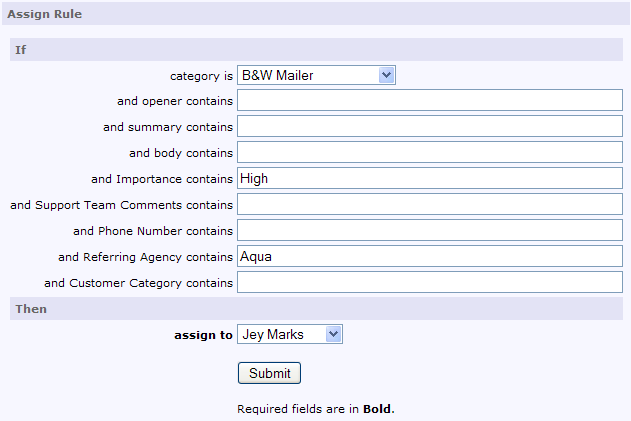
You also create the B&W Mailer product.
Then, you create two Assign Rules:
- Rule 1: if product is B&W Mailer and importance is High and the referring agency contains Aqua then assign to Jey Marks.
- Rule 2: if product is B&W Mailer and importance is High and the referring agency contains Tennison’s Yard then assign to Jey Marks.
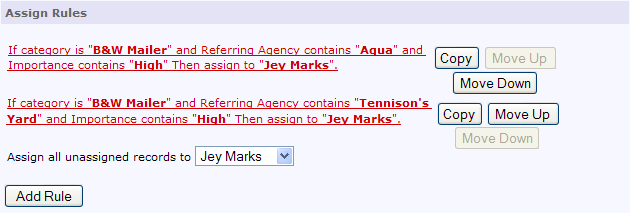
Now, when the system receives a question of high importance that references the B&W Mailer, from a user who is referred by the Aqua/Tennison’s Yard agency, it assigns this question to user Jey Marks.
This example well illustrates the principle for all the three types of Rules.
Escalation Rules Maintenance
This feature is available in CRMdesk Professional Edition only.
Usage
Escalation Rules are used to ensure that no questions are left “unattended” for a long time. After a question has not been processed for a certain user-defined period of time, an automatic notification about that can be sent to the assignee. In addition, before the notification is sent, the question can be reassigned to another Support Desk User.
To define the new assignee (where applicable) and which (or none) notifications to send to customers and support staff, the system uses:
- The category of the question;
- The time period in hours since an event occurred: the question was created or it was assigned a certain status;
as well as the presence of user-defined character strings in:
- Opener’s name;
- Question summary;
- Question body;
- Customer and question custom fields’ values.
Path
Setup tab – Workflow – Workflow Rules - Escalation Rules section
Procedure
To change a Rule, click the Rule description in the list. To create an Escalation Rule, click the Add Rule button below the Escalation Rules list. You can also change the order in which the Rules are applied during question processing by clicking Move Up or Move Down buttons next to the Rules’ description in the list. The Rule at the top of the list is applied first, and the Rule at the bottom is applied last.
Example
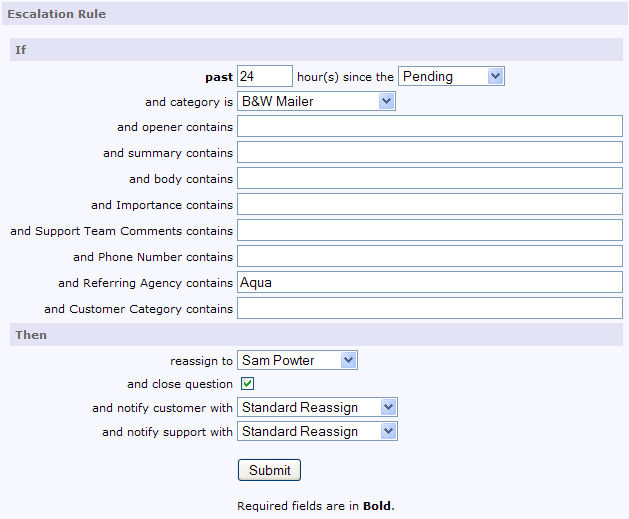
You want to make sure that your staff member Sam Powter necessarily reviews all questions coming from the Aqua agency customers pertaining to the B&W Mailer product within 12 hours after they were created or 24 hours after they have been acquired the Pending status. In addition, you want to notify the customer and support staff with a ‘Standard Reassign’ message.
You should create the B&W Mailer product and the Aqua referring agency.
You will also need to create an e-mail notification template for this purpose and title it ‘Standard Reassign’.
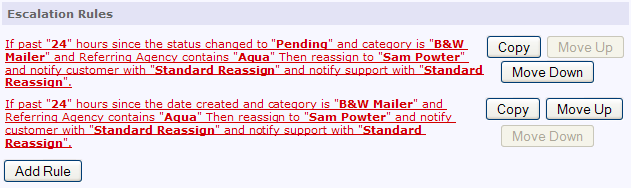
Then, you create two Escalation Rules:
- Rule 1: if past 12 hours since the Date Created and product is B&W Mailer and referring agency is Aqua then assign to Sam Powter and notify the customer and support staff with Standard reassign.
- Rule 2: if past 24 hours since the Pending and product is B&W Mailer and referring agency is Aqua then assign to Sam Powter and notify the customer and support staff with Standard Reassign.
Mail Rules Maintenance
This feature is available in CRMdesk Professional Edition only.
Usage
When e-mail integration is used, Mail Rules define how the system creates questions based on the messages received via the interface with your support e-mail account. If there is no customer record for the sender but a Mail Rules has been found, the system creates a new customer account and then a new question. After a mail rule is applied, the system processes the new question using Assign Rules.
To define the product and the area as well customer and question custom fields’ values, the system searches for character strings that you have defined in:
- Sender’s e-mail address/name
- Recipient’s e-mail address/name
- Message subject
- Message body
For every Mail Rule, you should fill at least the ‘Category’ field.
Path
Setup tab – Workflow – Workflow Rules - Mail Rules section
Procedure
To change a Rule, click the Rule description in the list. To create a Mail Rule, click the Add Rule button below the Mail Rules list. You can also change the order in which the Rules are applied during question processing by clicking the Move Up or Move Down buttons next to the Rules’ description in the list. The Rule at the top of the list is applied first, and the Rule at the bottom is applied last.
Example
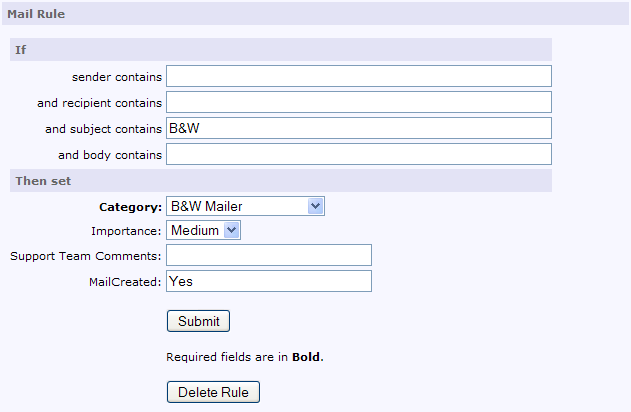
You require that every message that is received by your support e-mailbox contains the word ‘B&W’ in the subject line or body text should be converted into a question which refers to the B&W Mailer product. In addition, it is required that all new customer accounts created with a Mail Rule should be verified by user Sam Powter.
First, make sure you have created the B&W Mailer product.
Next, you create a customer custom field for Support Desk only and title it, say, ‘MailCreated’. You ask your staff not to fill this field when creating customer accounts manually. You decide that all new customer records created using a Mail Rule should have the word Yes in this field. The system will automatically populate custom field value on the fly according to the rule, and then will use that field value as criteria for another rule.
Then, you create three Rules:
- Mail Rule 1: if subject contains B&W then move to product B&W Mailer, MailCreated: Yes.
- Mail Rule 2: if body contains B&W then move to product B&W Mailer, MailCreated: Yes.
- Assign Rule 1: if product is B&W Mailer and MailCreated Yes then assign to Sam Powter.
Next: Integration