Custom Fields Settings
This feature is available in CRMdesk Professional Edition only.
Definition
Fields in question headers and customer records that are not initially pre-defined in the system and need to be defined by the system administrator.
Usage
Default CRMdesk settings may not reflect all customer and question attributes that your team may need to track. The system gives you a way to define an unlimited number of custom fields for questions entry form and customer’s registration form, which can then be used for filters and reporting.
For example, you want to know your customers’ company name and the priority of each question created. Thus, you create a custom field titled ‘Company’ for customers registration form, and a custom field titled ‘Priority’ for questions entry form.
Path
Setup tab – Support Desk Setup – Custom Fields
Procedure
Items in each group are handled similarly.
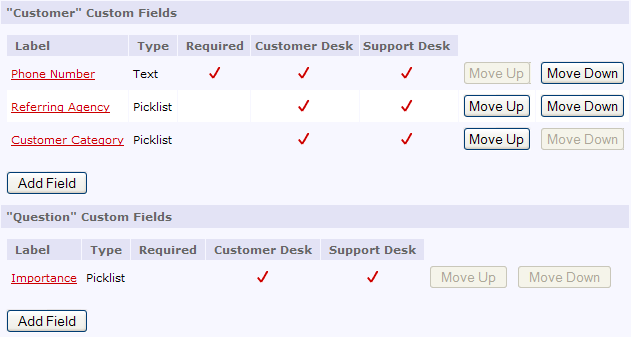
The Custom Fields overview page contains two lists of custom fields:
- Customer Custom Fields
- Question Custom Fields
This page allows you to:
- Add new custom fields with the help of the Add Field button;
- Access a field details to change them;
- Change the order in which the custom fields appear in questions and customer records by clicking Move Up or Move Down buttons on the right of each field in the list; however, note that custom fields are always located below standard fields.
To add a new ‘customers’ or ‘questions’ custom field, click the Add Field button below the respective group and choose the field data type in the next window:
- Text fields allow entering plain text and have no field value restrictions;
- Picklists allow choosing a value from a pre-defined set of values.
The next step, processing field details, is the same as editing an existing custom field (see below).
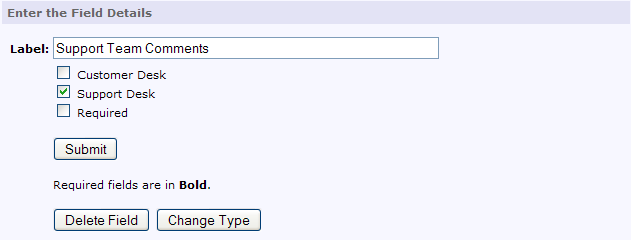
To edit a custom field, click the field title on the Custom Fields overview page. The field details page appears.
Regardless of its type, each field is described by the following attributes:
- Customer Desk – select this box if you want the field to appear in the Customer Desk application (i.e. make it accessible for your customers);
- Support Desk – select this box if you want the field to appear in the Support Desk application (i.e. make it accessible for your support team members);
- Required – select this box if the field should always be populated (i.e. it is a required field); all required fields in questions and customer records are in bold.
Editing text fields
Enter the custom field’s label. This text will appear as field title in questions and customer processing. Click the Submit button to save your changes.
Editing picklist fields
Enter the custom picklist values in the text area in the middle of the field details page. These values should be separated by line breaks.
The remaining two options are:
Sort values alphabetically – select this box if you want the system to present the available values in the alphabetic order.
Use the first value as default – select this box if you want the system to suggest the first (upper) value in your list as default during question or customer processing.
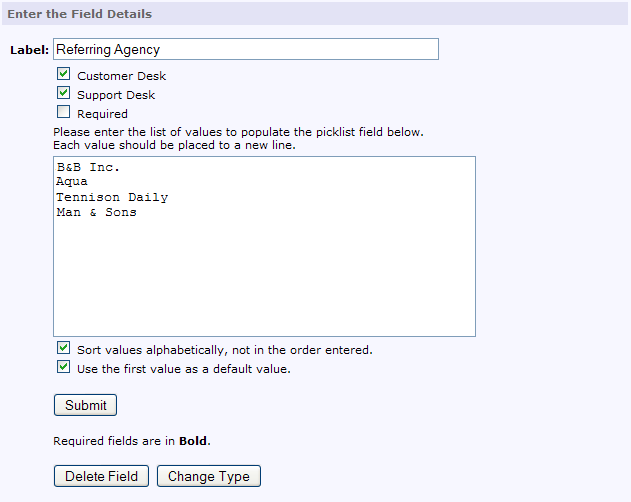
Example: you enter the following values for the ‘Referring Agency’ picklist field:
B&B Inc.
Aqua
Tennison Daily
Man & Sons
If you choose to Sort values alphabetically, during question and customer processing the values will appear in the following order:
Aqua
B&B Inc.
Man & Sons
Tennison Daily
If you do not select Use the first value as default, the system will always suggest the ‘Aqua’ value as default.
However, if you believe most of your customers are referred by the B&B agency, select Use the first value as default, and the system will always suggest the ‘B&B Inc.’ value as default.
To save your changes, click the Submit button.
To change a custom field’s data type, access the field details window and click the Change Type button. The following steps are the same as in creating a new custom field (see above) of the corresponding type. In addition, the system keeps the field label and interface parameters preloaded. If you change the field type from a picklist to text and then back to picklist, the system retains the old picklist values and sorting parameters.
To delete a custom field, access field details window and click the Delete Field button.
Tips
Although custom fields are a very powerful feature, do not overuse them. Try to keep the number of required fields to minimum, especially for the Customer Desk application. The more information customers are required to enter, the less eager they become to use your support system.
However, you might want your support staff to classify all customers for internal purposes, so you can use a required field in customer records and use it only in the Support Desk.
Next: Question Status Settings